Equipments:
- A wound
- Pros-aide
- Pros-aide clear
- Powder
- Powder brush
- Baby buds
- Bowl x 2
- Cotton pads
- Barrier foam
- Isoprophy alcohol
- Fx palette
- Kryolan Supracolor palette
- Ground coffee beans
- Multi gel
- Fine brushes
- Wooden laminating brush
- Pus
Directions:
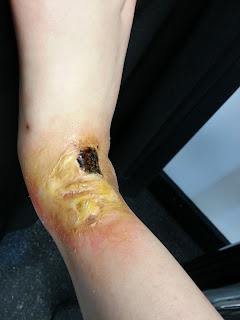
1. On below is the wound that I will be using for my snake bite project.
On below is the wound that I've created with my first mold and I'm going to use it for practice of my snake bite wound.
2. Apply barrier foam to the area that you going to place the wound on your skin. After that, apply pros-aide with a baby bud on the area you want to place the wound on your skin and on the back of the wound as well. Make sure the edges on the wound is covered with pros-aide as well. After the glue gets tacky and clear on both the skin and also on the back of the wound, stick the wound onto the skin and press it with your hand.
3. After the wound has stick onto the skin nicely, use the isoprophy alcohol and a baby bud to blend the edges of the wound to the skin. This will help to melt the harsh lines of the wound.4. Add some color to the wound. I have first mixed the color on the fx palette with isoprophy alcohol (to match the skin tone). Then, I have mixed the color in yellowish brown color to create the color on the wound. After that, I have applied some red and brown color around the wound to create redness on the skin. In order to create depth and more three dimensional on the shape of the wound, I have added some dark brown color on the side of the shapes to make them stand out more. I have also mixed the yellowish color with white to create shine effect on the wound.
5. After that, I have applied some multi gel on the area that I want the eschar to place on and then I have used ground coffee beans to place on top. After it dries a while, I have added black colours on top of it so as to create dark eschar.
Without pus -
With pus -
To improve, I can blend the red and brown color around the edges more so it will not have harsh lines. On above, I have compared the wound before I have applied the pus on and after. I really like how the snake bite wound look after I have applied the pus as it gives a more realistic result and also create more shine on the wound.


No comments:
Post a Comment